Color banding is a common issue that can affect various visual mediums, including screens, photographs, and videos. It refers to the visible gradient or abrupt transitions between different shades of color, resulting in a loss of smoothness and detail. This phenomenon can be frustrating, especially when it occurs in important visuals like movies, graphics, or even your favorite TV show.
In this blog post, we will explore the causes of color banding and provide you with practical tips and techniques to help reduce or eliminate it. Whether you’re dealing with banding on your TV, monitor, or computer graphics, we’ve got you covered. We will also discuss specific scenarios, such as banding in hair color or bleached hair, and provide solutions tailored to those situations.
So, if you’re tired of dealing with unsightly color banding, keep reading to discover how you can overcome this issue and enjoy a more visually pleasing experience. Let’s dive in and find out how you can fix color banding for good!
How to Banish Color Banding with Style and Sass!
Understanding the Woes of Color Banding
Have you ever been mesmerized by a breathtaking sunset photograph, only to be disappointed when viewing it on your computer screen? The beautiful gradients are marred by unsightly color banding, those dreaded strips of different shades that ruin the smoothness and subtlety of the image. But fear not, dear reader! We are here to save the day and banish color banding from your digital life, with a touch of style and sass!
1. Embrace the Magic of Dithering
Dithering, oh dithering, you magical little wizard! In the realm of digital imagery, dithering is your knight in shining armor. By adding a sprinkle of noise to your image, dithering breaks up those abrupt transitions between colors. Your eye will thank you as it delights in the smooth and seamless gradients that once seemed elusive.
2. Tweak Your Color Settings
Ah, the power of adjustment! Don’t be afraid to dive into your color settings and make some tweaks. Start by ensuring your display is set to its highest color depth. A depth of 24 bits or higher will give you a larger palette to work with, resulting in smoother transitions between colors. It’s like giving your image a fancy upgrade to business class!
3. Go for the Goldilocks Compression
Compression can be a tricky beast. Too much compression and you’ll end up with a pixelated mess. Too little compression and your image sizes will start ballooning faster than a baker’s dough. Find that sweet spot, that Goldilocks level of compression where the file size is just right. Opt for lossless formats like PNG or TIFF if possible, and bid farewell to those pesky color banding issues.
4. The Art of Gradient Mapping
For those seeking an artistic touch, gradient mapping is the name of the game. This nifty technique allows you to remap the colors of your image to a custom gradient. By carefully choosing your gradient, you can create stunning visual effects and bid adieu to color banding. It’s like having your own personal color stylist!
5. Unleash the Power of Inpainting
Sometimes, when all else fails, we need to call in the big guns. Enter inpainting, the digital magician capable of filling in those nasty color banding gaps. By analyzing the surrounding pixels, inpainting algorithms can magically smooth out the transitions and restore the beauty of your image. It’s like having a Photoshop fairy wave her wand and make all the imperfections disappear.
Now You’re Ready to Conquer Color Banding!
With these tips and tricks up your sleeve, color banding doesn’t stand a chance! Embrace the power of dithering, make friends with your color settings, find the perfect compression level, experiment with gradient mapping, and unleash the magic of inpainting. Your images will shine brighter, your viewers will marvel at your expertise, and color banding will become a distant memory. Go forth and conquer, you colorful warrior!
FAQ: How do you fix color banding
Color banding is a frustrating issue that can occur when there are noticeable, sudden transitions of color gradients in images, videos, or displays. Whether you’re a photographer, videographer, or simply an avid consumer of visual media, color banding can ruin your viewing experience. But fear not! In this FAQ-style guide, we’ll address the most common questions related to color banding and provide practical solutions to fix this pesky problem.
How do you reduce color banding
If you’re looking to minimize color banding in your visuals, here are a few tried-and-tested techniques:
Adjust your display settings
- Fiddle with the brightness and contrast: Tweaking these settings can sometimes alleviate color banding issues. Give it a shot!
- Enable dithering: Dithering is a technique that adds random noise to smooth out color transitions. Check your display settings to see if this option is available.
Upgrade your equipment
- Invest in a higher-quality monitor: Low-end monitors can be more prone to color banding. By upgrading to a monitor with better color depth and coverage, you can significantly reduce banding.
What is film banding
Film banding often occurs in videos and movies where noticeable color gradients appear as distinct bands rather than smooth transitions. It can result from compression during rendering or playback, or even due to the limitations of the source material. To improve film banding, utilizing higher bit-depth formats and reducing compression can make a noticeable difference.
How do I stop the color banding on my TV
To put an end to color banding on your TV, try the following steps:
- Check your TV’s settings: Ensure your TV is set to the highest bit depth available (commonly 8-bit or 10-bit) for better color reproduction.
- Disable unnecessary post-processing effects: Some TVs may apply excessive image processing, which can amplify color banding. Turn off any unnecessary settings like “noise reduction” or “sharpness enhancement.”
- Consider professional calibration: If you’re still grappling with color banding, consulting a professional TV calibrator might be a worthwhile investment.
What is banding on graphics
Banding on graphics refers to the presence of visible color steps or bands in digital images or visual designs. It can be particularly prominent in low-color-depth formats like GIFs or when there are limited shades in the original image. To combat banding in graphics, increasing the color depth, utilizing dithering techniques, or applying gradient noise can all help to smooth out the transitions.
How do I turn off banding in Lightroom
To address banding issues in Lightroom, you can try the following steps:
- Increase the bit depth: Under Lightroom’s preferences, you can set the default bit depth for editing to a higher value. Opting for 16-bit editing allows for more color information, reducing the likelihood of visible banding.
- Apply noise/texture: Adding a subtle amount of noise or texture to the affected areas can minimize the appearance of banding.
- Use gradient tools: Employing Lightroom’s gradient tools, such as the Graduated Filter or Radial Filter, can smooth out color transitions and mitigate banding effects.
How do I fix my computer banding
When it comes to fixing color banding on your computer, consider these approaches:
- Update your graphics driver: Often, outdated or incompatible graphics drivers can cause banding issues. Visit the manufacturer’s website to download and install the latest driver for your graphics card.
- Change your color settings: Adjusting your computer’s color settings might help. Experiment with different color profiles or color depths to find a setting that minimizes banding.
- Use software solutions: Several software applications, both free and paid, are designed to reduce banding in graphics. Explore options like FidelityFX, which can help enhance image quality and reduce banding artifacts.
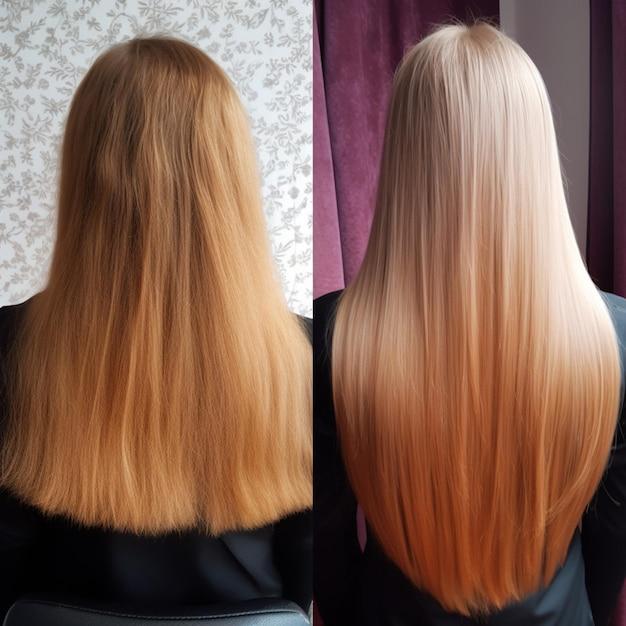
What is hair color banding
Hair color banding refers to visible bands of color in hair dyeing or bleaching processes. It can occur when applying color or bleach unevenly, resulting in distinct bands of different shades rather than a smooth gradient. To avoid hair color banding, it’s best to consult a professional hairstylist who can ensure even application and consistent results.
What is banding on a monitor
Banding on a monitor refers to the visible appearance of color steps or bands in displayed images or videos. It can be caused by several factors, including a low-color-depth display, inadequate calibration, or inefficient graphics card. To address banding on a monitor, consider upgrading to a higher-quality display, calibrating the monitor settings, and ensuring your graphics card is up to date.
How do you remove LED strips without removing paint
Removing LED strips without damaging the paint on your walls can be a delicate task. Here’s a safe approach:
- Heat the adhesive: Use a hairdryer or a heat gun on low heat to warm up the adhesive behind the LED strip. This will help loosen the bond with the wall.
- Peel gently: Once the adhesive is warmed up, slowly and carefully peel the LED strip off the wall, applying even pressure to avoid paint damage.
- Clean up any residue: If there’s leftover adhesive residue, use an adhesive remover or rubbing alcohol to clean the area without harming the paint.
What is banding in bleached hair
In the context of hair bleaching, banding refers to the presence of distinct lines or bands of color on the hair shaft. This can occur if the bleach mixture is not applied evenly or if overlapping applications are insufficient. To prevent banding, ensure thorough application of the bleach mixture, covering all areas evenly. Consulting a professional hairstylist experienced in bleaching techniques is highly recommended.
How do you calibrate a Windows monitor
To calibrate your Windows monitor accurately, follow these steps:
- Open the display settings: Right-click on your desktop and select “Display settings.”
- Access the calibration tool: Scroll down and click on “Advanced display settings.” Then, choose “Color calibration” to launch Windows’ built-in calibration tool.
- Follow the on-screen instructions: Windows will guide you through a series of steps to adjust gamma, brightness, contrast, and color balance. Take your time and make adjustments as needed to achieve the desired calibration.
Do LED lights cause banding
LED lights themselves do not cause banding. However, when used in combination with certain cameras or video recording techniques, LED lights can reveal or amplify existing banding issues. To minimize the potential for banding, ensure proper camera settings, adjust the lighting setup if needed, or explore alternative lighting options.
How do I know if my TV is 8-bit or 10-bit
Determining whether your TV is 8-bit or 10-bit can usually be done through the following steps:
- Access the TV settings: Navigate to your TV’s menu or settings.
- Find the display information: Look for the display or picture section in the menu. You’re searching for a setting related to bit depth or color depth.
- Inspect the available options: If you see the choice between 8-bit and 10-bit, your TV supports both. Conversely, if only 8-bit is available, that means your TV is limited to 8-bit color depth.
What is HDR color banding
HDR color banding refers to the appearance of visible bands or steps in color gradients when viewing high dynamic range (HDR) content. This occurs when there is insufficient color bit depth to represent the smooth transitions within HDR imagery. To mitigate HDR color banding, ensuring that your display, media player, and source content are all capable of handling higher bit depths and broader color gamuts is crucial.
What is computer banding
In the context of computers, banding refers to the visible appearance of color steps or bands in images, videos, or visual graphics. It can arise due to limitations in color depth, inadequate graphics rendering, compression artifacts, or display hardware restrictions. Addressing computer banding often entails adjusting software settings, upgrading hardware components if necessary, or employing post-processing techniques to mitigate the issue.
What causes color banding
Color banding can have several causes, including:
- Low color depth: Displays or graphics with limited color depth can struggle to represent smooth gradients, leading to banding.
- Compression artifacts: Compressing visual media can sometimes result in information loss, causing banding in certain scenarios.
- Inadequate calibration: Improper calibration of displays or cameras can contribute to color banding issues.
- Software limitations: Some applications or media players may not handle high-bit-depth content properly, leading to banding.
- Limitations of the source material: If the original image or video has limited color information, banding may be more pronounced.
What causes banding in video
Banding in videos can be caused by a variety of factors:
- Compression: When videos are highly compressed, color nuances can be lost, resulting in visible banding.
- Low bit depth: Videos with low bit depth can struggle to represent smooth color transitions, leading to banding artifacts.
- Poor encoding: Improper video encoding techniques can introduce banding during the compression process.
- Editing or rendering settings: Incorrect settings during video editing or rendering can contribute to banding issues.
- Display limitations: If the display device has a low color depth or inadequate calibration, banding can become more noticeable.
With these FAQs, you’re now armed with the knowledge to combat color banding and enhance your visual experiences. Say goodbye to frustrating color gradients and hello to smooth, natural transitions. Embrace the world of vibrant, seamless visuals like a true connoisseur!